

Thrift Store Furniture Makeover
It is time for another Thrift Store Challenge! I have been participating in these monthly Thrift Store Challenges with a group of very creative bloggers for the last few months. It is so much fun. For this challenge, we did not have a theme or any budget (but try to keep it as budget friendly as possible). Just buy something from a thrift store and spruce it up, paint it, etc. and do what you wish with it. I chose to do a Thrift Store Furniture Makeover this month. You can see my past projects here.
Please check out all the other participants in the Thrift Store Challenge at the bottom of this post.
What I found this month…
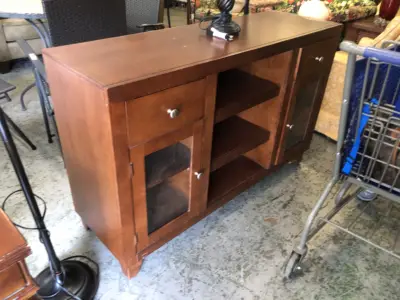
I was on the hunt for the perfect table that would fit nicely under the lighthouse gallery wall I installed a few weeks ago. While out thrifting, I stopped at our local Goodwill store and spotted this table. It was the perfect size and shape for my Thrift Store Furniture Makeover, but there was no price on it. I tried to find an employee to ask how much they were asking for it, but the store was busy and no one was available to ask. I didn’t have much time to wait, so I left. However, I couldn’t stop thinking about it! I went back the next day to see if it was still there, and thankfully it was! YIPEEEE! Yet, there still was no price on it. This time the store was not busy and I was able to easily find an employee to ask for a price. When the manager said, how about $19.99, I quickly said YES, bought it, and had them put it in my car ASAP. It isn’t in perfect condition and appears to have been a TV Stand, but that was ok with me. I knew I’d be painting it anyhow.
Here are the Steps in my Thrift Store Furniture Makeover
This post contains some affiliate links for your convenience (which means if you make a purchase after clicking a link I will earn a small commission which helps keep my blog up and running but it won’t cost you a penny more)!
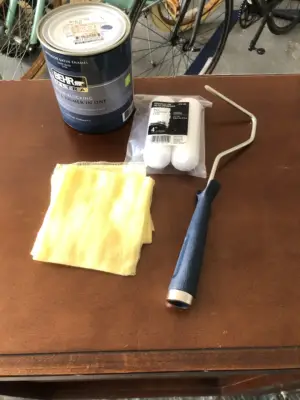
Materials Used for this Thrift Store Furniture Makeover…paintbrush |
Step 1, Purchase Paint and Supplies
I went to Home Depot to chose a paint color. This is always overwhelming for me with the endless color choices!!! However, I found one I liked right away! I was looking for a navy-ish, nautical-ish blue and picked the color, English Channel. When I told the man at Home Depot that I was painting a piece of furniture, he suggested using Behr Stain Blocking Paint and Primer in One. This stuff is pretty awesome and did not disappoint. I have used Chalk Paint in the past for painting furniture and that works well too.
While there, I picked up some Tack Cloths, and rollers for my small paint roller. I already had all the other supplies I needed at home.
Step 2, Sand and Clean…
I gave the entire piece a light sanding using my hand sander. You can see there was some damage on the top, but I wasn’t worried about that since I knew I’d be painting over it. Please make sure you wear a mask and safety goggles when sanding. Once done, I used a tack cloth to clean the entire piece thoroughly. Tack cloths are awesome as they pick up everything, but a rag would work fine too.
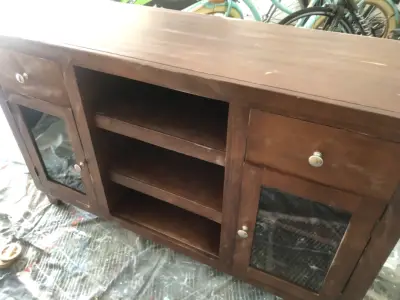

Step 3, Paint…
Once it was sanded lightly and cleaned and the knobs were taken off, I began to paint. This is the longest step. It took about 3 coats. I used my roller on the big pieces, and a paint brush when needed on the smaller areas. Here it is below, after 1 coat.
After I was done painting and it was all dry, I used one coat of this Minwax Satin Polycrylic Protective Finish.

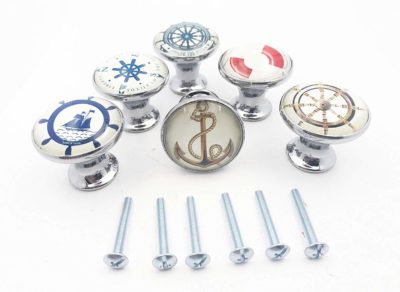
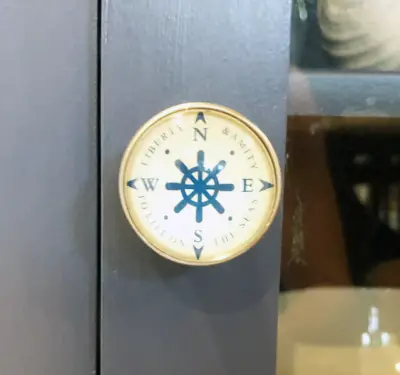
Step 4, New Knobs and Styling…
I made sure to wait until the top coat was completely dried before I installed these adorable nautical knobs I found on Amazon. Then, my husband and I carried it inside.
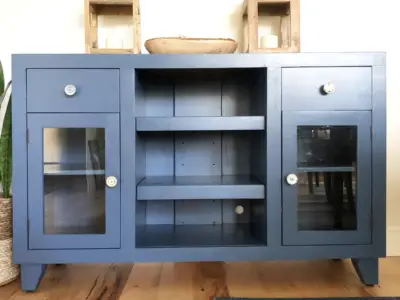
Ta-da, A Perfect Fit!
Below is the finished product. I am thrilled with how it turned out, and it wasn’t hard to do AT ALL. It just took time (about 3-4 hours total), patience, and a little elbow grease.
It is a perfect fit and gives me lots of extra storage. Overall, not to shabby for $19.99! What do you think?


Pin for Later…

Please check out the other Thrift Store Challenge Participants and see their AMAZING Finds below…
Terrie from Decorate and More with Tip
Tara from Stilettos and Shiplap
Dori from This Full Life 5

Emily at Le Cultivateur

Cindy from Cloches & Lavender

Shae at Sweet Southern Grace


15 Comments
Jodi, this looks amazing!!! I love the color that you used! And those knobs are so cute! Such a great detail! Seriously loving this!!!
~Emily
Thank you so much, Emily! That means so much to me, coming for a talented lady like you. So glad you like it!
Jodi!! You are so talented!! I love that blue! It is just stunning!
Thank you so much, Shae! I am so happy you like it.
What amazing makeover. I am in love with the color you painted it. It looks stunning. Great find, makeover and decor piece for your home. Love it!
Thank you so much, Terrie! Love these challenges so much!
Jodi this piece was made for your home and that exact spot! It’s perfect. Love the color your chose for this spot too. Great job!
Thank you, Tara! It is the perfect fit and I am thrilled with how it came out.
It’s absolutely stunning Jodi! What a beautiful transformation and it look amazing under your lighthouse photos!
Thank you so much, Dori! That means a lot to me. I’m so glad you like it. I just love these challenges and working with you ladies!
Wowza! This is stunning! Love the color💙
Thank you so much!!!!
Perfect all the way around. The price,the paint and those adorable knobs go so well under your gallery wall.
Thank you so much! I am so happy that you like it.
[…] Jodi at The House House Blog […]